| .. | ||
| apple-configurator-certificates.png | ||
| apple-configurator-general.png | ||
| apple-configurator-vpn.png | ||
| README.md | ||
| ulagen.py | ||
| ulagen.py.sig | ||
How to self-host a hardened strongSwan IKEv2/IPsec VPN server for iOS and macOS
Heads up: when following this guide on IPv4-only servers (which is totally fine if one knows what we are doing), it’s likely IPv6 traffic will leak on iOS when clients are connected to carriers or ISPs running dual stack (IPv4 + IPv6) infrastructure. Leaks can be mitigated on iOS (cellular-only) and on macOS by following this guide.
Requirements
- Virtual private server (VPS) or dedicated server running Debian 10 (buster)
- Computer running macOS Mojave or Catalina
- Phone running iOS 12 or 13
Guide
Step 1: create SSH key pair used to setup server
For increased security, protect private key using strong passphrase.
When asked for file in which to save key, enter vpn-server.
$ cd ~/.ssh
$ ssh-keygen -t rsa -C "vpn-server"
Generating public/private rsa key pair.
Enter file in which to save the key (/Users/sunknudsen/.ssh/id_rsa): vpn-server
Enter passphrase (empty for no passphrase):
Enter same passphrase again:
Your identification has been saved in vpn-server.
Your public key has been saved in vpn-server.pub.
The key fingerprint is:
SHA256:4On7WymZIcM5p8SbsybwJpaFIUrnTUMf/1fdAhI1WPY vpn-server
The key's randomart image is:
+---[RSA 3072]----+
|          .==    |
|     . .  o..o   |
|    . o o  . .E o|
|.... * = .    ..o|
|o.ooo % S .   .. |
|. o..+ O + o .   |
|   =  * + o .    |
|  + + .+ o       |
| . o oo.o.       |
+----[SHA256]-----+
Step 2: log in to server as root
Replace 185.193.126.203 with IP of server.
If server uses password authentication, run the following and type in password.
ssh root@185.193.126.203
If server uses public key authentication (using the key pair from step 1), run the following and type in passphrase.
ssh root@185.193.126.203 -i ~/.ssh/vpn-server
Step 3: add SSH public key to authorized_keys
This step is required only if server was configured without public key authentication.
When copy/pasting commands that start with
cat << "EOF", select all lines (fromcat << "EOF"toEOF) at once as they are part of the same (single) command
On Mac, run:
echo "cat << \"EOF\" > ~/.ssh/authorized_keys
$(cat ~/.ssh/vpn-server.pub)
EOF"
On server, paste output from Mac command and press enter.
cat << "EOF" > ~/.ssh/authorized_keys
ssh-rsa AAAAB3NzaC1yc2EAAAADAQABAAABgQCu4k9OcJlatGgUoo41m18Hekv+nSHq1w7qcuAuOZWLI8y5aYkLzyEgyp7EibB0rcmwiZfwx/RDb5zAvlr9KGsOWOYJ/gRIf4AwK1PdBPDo8jaa02J/H585NHV7T7XJ7Ycl/LeJh+oDXGs4OOspiFM/7NuleqCA0sSuJEnnuuTZsIDAlJwtWIJTM8lg4nWCQx2xAGkRyx4eNHE2vmlg+xHu3PbHg9kpSIaBWpx0WsysypyaB77+pkid6kYzxPXexoxFm4FnkoY7PZGb97wl4FwW1EK/yo9rnwbtEq5ny96JEHqeJdxeBGHYrsAoRro4jPWYXvdXZV2s27NYC6S3yHsJdaLfyfJXyTaygOyyaf39GcwqfJZpmVYwVyfZ2Go6ec9R/dFbKEA4Ue7aeCkDskSTiMuUZjYjfhezpa4Y0Jiy+lDZFVSv3tsBYu7Nxq0erZ2ygRJAXUMvvyFICJQGUhblRGXAOwYUt72CSUM0ZMsr84aOWsyzRwVQXzxETuDgnXk= vpn-server
EOF
On server, confirm the output from cat ~/.ssh/authorized_keys matches the output from cat ~/.ssh/vpn-server.pub on Mac.
Step 4: create vpn-server-admin user
When asked for password, use output from openssl rand -base64 24 (and store password in password manager). For all other fields, press enter. Then press y.
adduser vpn-server-admin
Step 5: copy root’s authorized_keys file over to vpn-server-admin’s home folder.
mkdir /home/vpn-server-admin/.ssh
cp /root/.ssh/authorized_keys /home/vpn-server-admin/.ssh/authorized_keys
chown -R vpn-server-admin:vpn-server-admin /home/vpn-server-admin/.ssh
Step 6: set root password
When asked for password, use output from openssl rand -base64 24 (and store password in password manager).
passwd
Step 7: log out
exit
Step 8: log in as vpn-server-admin
Replace 185.193.126.203 with IP of server.
ssh vpn-server-admin@185.193.126.203 -i .ssh/vpn-server
Step 9: switch to root
When asked, enter root password.
su -
Step 10: update SSH config to disable root login and password authentication and restart SSH daemon
sed -i -E 's/(#)?PermitRootLogin (prohibit-password|yes)/PermitRootLogin no/' /etc/ssh/sshd_config
sed -i -E 's/(#)?PasswordAuthentication yes/PasswordAuthentication no/' /etc/ssh/sshd_config
systemctl restart ssh
Step 11: update apt and upgrade packages
apt update
apt upgrade -y
Step 12: install and configure vim
apt install -y vim
cat << "EOF" > ~/.vimrc
set encoding=UTF-8
set termencoding=UTF-8
set nocompatible
set backspace=indent,eol,start
set autoindent
set tabstop=2
set shiftwidth=2
set expandtab
set smarttab
set ruler
set paste
syntax on
EOF
Step 13: set timezone (the following command is for Montreal time)
See https://en.wikipedia.org/wiki/List_of_tz_database_time_zones for available timezones.
timedatectl set-timezone America/Montreal
Step 14: install curl and python and generate random IPv6 ULA
Shout out to Andrew Ho for ulagen.py.
The following code block downloads and runs ulagen.py (optionally download ulagen.py.sig to verify signature).
$ apt install -y curl python
$ curl -s https://sunknudsen.com/static/media/privacy-guides/how-to-self-host-a-hardened-strongswan-ikev2-ipsec-vpn-server-for-ios-and-macos/ulagen.py | python
Prefix:       fdc7:da04:1ee6::/48
First subnet: fdc7:da04:1ee6::/64
Last subnet:  fdc7:da04:1ee6:ffff::/64
Step 15: install iptables-persistent
When asked to save current IPv4 or IPv6 rules, answer Yes.
apt install -y iptables-persistent
Step 16: configure iptables
Replace eth0 (if needed) and fdc7:da04:1ee6::/64 with first subnet of step 14 (to display available interfaces, run ip a).
iptables -A INPUT -i lo -j ACCEPT
iptables -A INPUT -p tcp --dport 22 -j ACCEPT
iptables -A INPUT -p udp --dport 500 -j ACCEPT
iptables -A INPUT -p udp --dport 4500 -j ACCEPT
iptables -A INPUT -m state --state RELATED,ESTABLISHED -j ACCEPT
iptables -A FORWARD -s 10.0.2.0/24 -m policy --dir in --pol ipsec --proto esp -j ACCEPT
iptables -A FORWARD -d 10.0.2.0/24 -m policy --dir out --pol ipsec --proto esp -j ACCEPT
iptables -A OUTPUT -o lo -j ACCEPT
iptables -A OUTPUT -p tcp --dport 53 -m state --state NEW -j ACCEPT
iptables -A OUTPUT -p udp --dport 53 -m state --state NEW -j ACCEPT
iptables -A OUTPUT -p tcp --dport 80 -m state --state NEW -j ACCEPT
iptables -A OUTPUT -p udp --dport 123 -m state --state NEW -j ACCEPT
iptables -A OUTPUT -p tcp --dport 443 -m state --state NEW -j ACCEPT
iptables -A OUTPUT -m state --state RELATED,ESTABLISHED -j ACCEPT
iptables -t nat -A POSTROUTING -s 10.0.2.0/24 -o eth0 -m policy --pol ipsec --dir out -j ACCEPT
iptables -t nat -A POSTROUTING -s 10.0.2.0/24 -o eth0 -j MASQUERADE
iptables -t mangle -A FORWARD -m policy --pol ipsec --dir in -p tcp --tcp-flags SYN,RST SYN -j TCPMSS --set-mss 1280
iptables -t mangle -A FORWARD -m policy --pol ipsec --dir out -p tcp --tcp-flags SYN,RST SYN -j TCPMSS --set-mss 1280
iptables -P FORWARD DROP
iptables -P INPUT DROP
iptables -P OUTPUT DROP
If the server is IPv4-only, run:
ip6tables -P FORWARD DROP
ip6tables -P INPUT DROP
ip6tables -P OUTPUT DROP
If the server is dual stack (IPv4 + IPv6) run:
ip6tables -A INPUT -i lo -j ACCEPT
ip6tables -A INPUT -p ipv6-icmp -j ACCEPT
ip6tables -A INPUT -p udp --dport 500 -j ACCEPT
ip6tables -A INPUT -p udp --dport 4500 -j ACCEPT
ip6tables -A INPUT -m state --state RELATED,ESTABLISHED -j ACCEPT
ip6tables -A FORWARD -s fdc7:da04:1ee6::/64 -m policy --dir in --pol ipsec --proto esp -j ACCEPT
ip6tables -A FORWARD -d fdc7:da04:1ee6::/64 -m policy --dir out --pol ipsec --proto esp -j ACCEPT
ip6tables -A OUTPUT -o lo -j ACCEPT
ip6tables -A OUTPUT -p ipv6-icmp -j ACCEPT
ip6tables -A OUTPUT -p tcp --dport 53 -m state --state NEW -j ACCEPT
ip6tables -A OUTPUT -p udp --dport 53 -m state --state NEW -j ACCEPT
ip6tables -A OUTPUT -p tcp --dport 80 -m state --state NEW -j ACCEPT
ip6tables -A OUTPUT -p udp --dport 123 -m state --state NEW -j ACCEPT
ip6tables -A OUTPUT -p tcp --dport 443 -m state --state NEW -j ACCEPT
ip6tables -A OUTPUT -m state --state RELATED,ESTABLISHED -j ACCEPT
ip6tables -t nat -A POSTROUTING -s fdc7:da04:1ee6::/64 -o eth0 -m policy --pol ipsec --dir out -j ACCEPT
ip6tables -t nat -A POSTROUTING -s fdc7:da04:1ee6::/64 -o eth0 -j MASQUERADE
ip6tables -t mangle -A FORWARD -m policy --pol ipsec --dir in -p tcp --tcp-flags SYN,RST SYN -j TCPMSS --set-mss 1280
ip6tables -t mangle -A FORWARD -m policy --pol ipsec --dir out -p tcp --tcp-flags SYN,RST SYN -j TCPMSS --set-mss 1280
ip6tables -P FORWARD DROP
ip6tables -P INPUT DROP
ip6tables -P OUTPUT DROP
Step 17: log out and log in to confirm iptables didn’t block SSH
exit
exit
When asked, enter root password.
ssh vpn-server-admin@185.193.126.203 -i .ssh/vpn-server
su -
Step 18: make iptables rules persistent
iptables-save > /etc/iptables/rules.v4
ip6tables-save > /etc/iptables/rules.v6
Step 19: switch DNS nameservers over to privacy-conscious 1.1.1.1
Using 1.1.1.1 is optional but the default for this guide.
If the server is IPv4-only, run:
cp /etc/resolv.conf /etc/resolv.conf.backup
cat << "EOF" > /etc/resolv.conf
nameserver 1.1.1.1
nameserver 1.0.0.1
EOF
If the server is dual stack (IPv4 + IPv6) run:
cp /etc/resolv.conf /etc/resolv.conf.backup
cat << "EOF" > /etc/resolv.conf
nameserver 1.1.1.1
nameserver 1.0.0.1
nameserver 2606:4700:4700::1111
nameserver 2606:4700:4700::1001
EOF
Step 20: add and enable dummy network interface
cp /etc/network/interfaces /etc/network/interfaces.backup
cat << "EOF" >> /etc/network/interfaces

auto strongswan0
iface strongswan0 inet static
  address 10.0.2.1/24
  pre-up ip link add strongswan0 type dummy
EOF
ifup strongswan0
Step 21: install dnsmasq
apt install -y dnsmasq
Step 22: configure dnsmasq
cat << "EOF" > /etc/dnsmasq.d/01-dhcp-strongswan.conf
interface=strongswan0
dhcp-range=10.0.2.10,10.0.2.254,255.255.255.0
port=0
EOF
Step 23: restart dnsmasq
systemctl restart dnsmasq
Step 24: install strongSwan
If you are shown an "Old runlevel management superseded" warning, answer Ok.
apt install -y strongswan libcharon-extra-plugins
Step 25: configure strongSwan
Replace fdc7:da04:1ee6::/64 with first subnet of step 14
Backup and override /etc/ipsec.conf
cp /etc/ipsec.conf /etc/ipsec.conf.backup
If the server is IPv4-only, run:
cat << "EOF" > /etc/ipsec.conf
config setup
  charondebug="ike 1, knl 1, cfg 1"
  uniqueids=never

conn ikev2
  auto=add
  compress=no
  type=tunnel
  keyexchange=ikev2
  fragmentation=yes
  forceencaps=yes
  ike=aes256gcm16-prfsha512-ecp384!
  esp=aes256gcm16-ecp384!
  dpdaction=clear
  dpddelay=300s
  rekey=no
  left=%any
  leftid=vpn-server.com
  leftcert=vpn-server.crt
  leftsendcert=always
  leftsubnet=0.0.0.0/0,::/0
  right=%any
  rightid=%any
  rightauth=eap-tls
  rightdns=1.1.1.1,1.0.0.1
  rightsourceip=%dhcp
  rightsendcert=never
  eap_identity=%identity
EOF
If the server is dual stack (IPv4 + IPv6) run:
cat << "EOF" > /etc/ipsec.conf
config setup
  charondebug="ike 1, knl 1, cfg 1"
  uniqueids=never

conn ikev2
  auto=add
  compress=no
  type=tunnel
  keyexchange=ikev2
  fragmentation=yes
  forceencaps=yes
  ike=aes256gcm16-prfsha512-ecp384!
  esp=aes256gcm16-ecp384!
  dpdaction=clear
  dpddelay=300s
  rekey=no
  left=%any
  leftid=vpn-server.com
  leftcert=vpn-server.crt
  leftsendcert=always
  leftsubnet=0.0.0.0/0
  right=%any
  rightid=%any
  rightauth=eap-tls
  rightdns=1.1.1.1,1.0.0.1,2606:4700:4700::1111,2606:4700:4700::1001
  rightsourceip=%dhcp,fdc7:da04:1ee6::/64
  rightsendcert=never
  eap_identity=%identity
EOF
Backup and override /etc/ipsec.secrets
cp /etc/ipsec.secrets /etc/ipsec.secrets.backup
cat << "EOF" > /etc/ipsec.secrets
: RSA vpn-server.key
EOF
Backup and override /etc/strongswan.d/charon-logging.conf
cp /etc/strongswan.d/charon-logging.conf /etc/strongswan.d/charon-logging.conf.backup
cat << "EOF" > /etc/strongswan.d/charon-logging.conf
charon {
    filelog {
        charon {
            default = 1
        }
    }
    syslog {
        auth {
            default = 1
        }
    }
}
EOF
Backup and override /etc/strongswan.d/charon/dhcp.conf
cp /etc/strongswan.d/charon/dhcp.conf /etc/strongswan.d/charon/dhcp.conf.backup
cat << "EOF" > /etc/strongswan.d/charon/dhcp.conf
dhcp {
    force_server_address = yes
    identity_lease = yes
    interface = strongswan0
    load = yes
    server = 10.0.2.1
}
EOF
Disable unused plugins
cd /etc/strongswan.d/charon
sed -i 's/load = yes/load = no/g' ./*.conf
sed -i 's/load = no/load = yes/g' ./eap-tls.conf ./aes.conf ./dhcp.conf ./farp.conf ./gcm.conf ./hmac.conf ./kernel-netlink.conf ./nonce.conf ./openssl.conf ./pem.conf ./pgp.conf ./pkcs12.conf ./pkcs7.conf ./pkcs8.conf ./pubkey.conf ./random.conf ./revocation.conf ./sha2.conf ./socket-default.conf ./stroke.conf ./x509.conf
Step 26: create certificate authority (for security reasons, this is done on Mac rather than on server)
Create certificate-authority folder on desktop
mkdir ~/Desktop/certificate-authority
cd ~/Desktop/certificate-authority
Create OpenSSL config file (edit defaults if needed)
cat << "EOF" > openssl.cnf
[ req ]
distinguished_name = req_distinguished_name
attributes = req_attributes
[ req_distinguished_name ]
countryName = Country Name (2 letter code)
countryName_min = 2
countryName_max = 2
0.organizationName = Organization Name (eg, company)
commonName = Common Name (eg, fully qualified host name)
commonName_max = 64
countryName_default = CA # Defaults
0.organizationName_default = Self-hosted strongSwan VPN # Defaults
[ req_attributes ]
challengePassword = A challenge password
challengePassword_min = 4
challengePassword_max = 20
[ ca ]
subjectKeyIdentifier = hash
basicConstraints = critical, CA:true
keyUsage = critical, cRLSign, keyCertSign
[ server ]
authorityKeyIdentifier = keyid
subjectAltName = DNS:vpn-server.com # Defaults
extendedKeyUsage = serverAuth, 1.3.6.1.5.5.8.2.2
[ client ]
authorityKeyIdentifier = keyid
subjectAltName = email:client@vpn-server.com # Defaults
extendedKeyUsage = serverAuth, 1.3.6.1.5.5.8.2.2
EOF
Create certificate authority private key
$ openssl genrsa -out ca.key 4096
Generating RSA private key, 4096 bit long modulus
......................................++
........................................................................................................................................................................................................................................................................................++
e is 65537 (0x10001)
Create certificate authority root certificate
When asked for common name, enter vpn-server.com.
$ openssl req -x509 -new -nodes -config openssl.cnf -extensions ca -key ca.key -days 3650 -out ca.crt
You are about to be asked to enter information that will be incorporated
into your certificate request.
What you are about to enter is what is called a Distinguished Name or a DN.
There are quite a few fields but you can leave some blank
For some fields there will be a default value,
If you enter '.', the field will be left blank.
-----
Country Name (2 letter code) [CA]:
Organization Name (eg, company) [Self-hosted strongSwan VPN]:
Common Name (eg, fully qualified host name) []:vpn-server.com
Create vpn-server private key and certificate
When asked for common name, enter vpn-server.com and press enter to skip challenge password.
$ openssl genrsa -out vpn-server.key 4096
Generating RSA private key, 4096 bit long modulus
.................................................................................................................................................................................................................................................++
................................................................................++
e is 65537 (0x10001)

$ openssl req -new -config openssl.cnf -extensions server -key vpn-server.key -out vpn-server.csr
You are about to be asked to enter information that will be incorporated
into your certificate request.
What you are about to enter is what is called a Distinguished Name or a DN.
There are quite a few fields but you can leave some blank
For some fields there will be a default value,
If you enter '.', the field will be left blank.
-----
Country Name (2 letter code) [CA]:
Organization Name (eg, company) [Self-hosted strongSwan VPN]:
Common Name (eg, fully qualified host name) []:vpn-server.com

Please enter the following 'extra' attributes
to be sent with your certificate request
A challenge password []:

$ openssl x509 -req -extfile openssl.cnf -extensions server -in vpn-server.csr -CA ca.crt -CAkey ca.key -CAcreateserial -days 3650 -out vpn-server.crt
Signature ok
subject=/C=CA/O=Self-hosted strongSwan VPN/CN=vpn-server.com
Getting CA Private Key
Create vpn-client private key and certificate
When asked for common name, enter client@vpn-server.com and press enter to skip challenge password.
$ openssl genrsa -out vpn-client.key 4096
Generating RSA private key, 4096 bit long modulus
.........++
............................................................................++
e is 65537 (0x10001)

$ openssl req -new -config openssl.cnf -extensions client -key vpn-client.key -out vpn-client.csr
You are about to be asked to enter information that will be incorporated
into your certificate request.
What you are about to enter is what is called a Distinguished Name or a DN.
There are quite a few fields but you can leave some blank
For some fields there will be a default value,
If you enter '.', the field will be left blank.
-----
Country Name (2 letter code) [CA]:
Organization Name (eg, company) [Self-hosted strongSwan VPN]:
Common Name (eg, fully qualified host name) []:client@vpn-server.com

Please enter the following 'extra' attributes
to be sent with your certificate request
A challenge password []:

$ openssl x509 -req -extfile openssl.cnf -extensions client -in vpn-client.csr -CA ca.crt -CAkey ca.key -CAcreateserial -days 3650 -out vpn-client.crt
Signature ok
subject=/C=CA/O=Self-hosted strongSwan VPN/CN=client@vpn-server.com
Getting CA Private Key
Create vpn-client PKCS12 archive
When asked for export password, use output from openssl rand -base64 24 (and store password in password manager).
$ openssl pkcs12 -in vpn-client.crt -inkey vpn-client.key -certfile ca.crt -export -out vpn-client.p12
Enter Export Password:
Verifying - Enter Export Password:
Step 27: copy/paste the content of ca.crt, vpn-server.key and vpn-server.crt to server and make private key root-only.
On Mac: run cat ca.crt
On server: run vi /etc/ipsec.d/cacerts/ca.crt, press i, paste output from previous step in the window and press shift+z+z
On Mac: run cat vpn-server.key
On server: run vi /etc/ipsec.d/private/vpn-server.key, press i, paste output from previous step in the window and press shift+z+z
On Mac: run cat vpn-server.crt
On server: run vi /etc/ipsec.d/certs/vpn-server.crt, press i, paste output from previous step in the window and press shift+z+z
On server: run chmod -R 600 /etc/ipsec.d/private
Step 28: start strongSwan
systemctl restart strongswan
Step 29: configure sysctl
Backup and override /etc/sysctl.conf
cp /etc/sysctl.conf /etc/sysctl.conf.backup
sed -i -E 's/#net.ipv4.ip_forward=1/net.ipv4.ip_forward=1/' /etc/sysctl.conf
sed -i -E 's/#net.ipv4.conf.all.accept_redirects = 0/net.ipv4.conf.all.accept_redirects = 0/' /etc/sysctl.conf
sed -i -E 's/#net.ipv4.conf.all.send_redirects = 0/net.ipv4.conf.all.send_redirects = 0/' /etc/sysctl.conf
If the server is IPv4-only, run:
cat << "EOF" >> /etc/sysctl.conf
net.ipv6.conf.all.disable_ipv6 = 1
net.ipv6.conf.default.disable_ipv6 = 1
net.ipv6.conf.lo.disable_ipv6 = 1
EOF
If the server is dual stack (IPv4 + IPv6) run:
sed -i -E 's/#net.ipv6.conf.all.forwarding=1/net.ipv6.conf.all.forwarding=1/' /etc/sysctl.conf
Reload sysctl
sysctl -p
Step 30: create VPN profiles for iOS and macOS using Apple Configurator 2
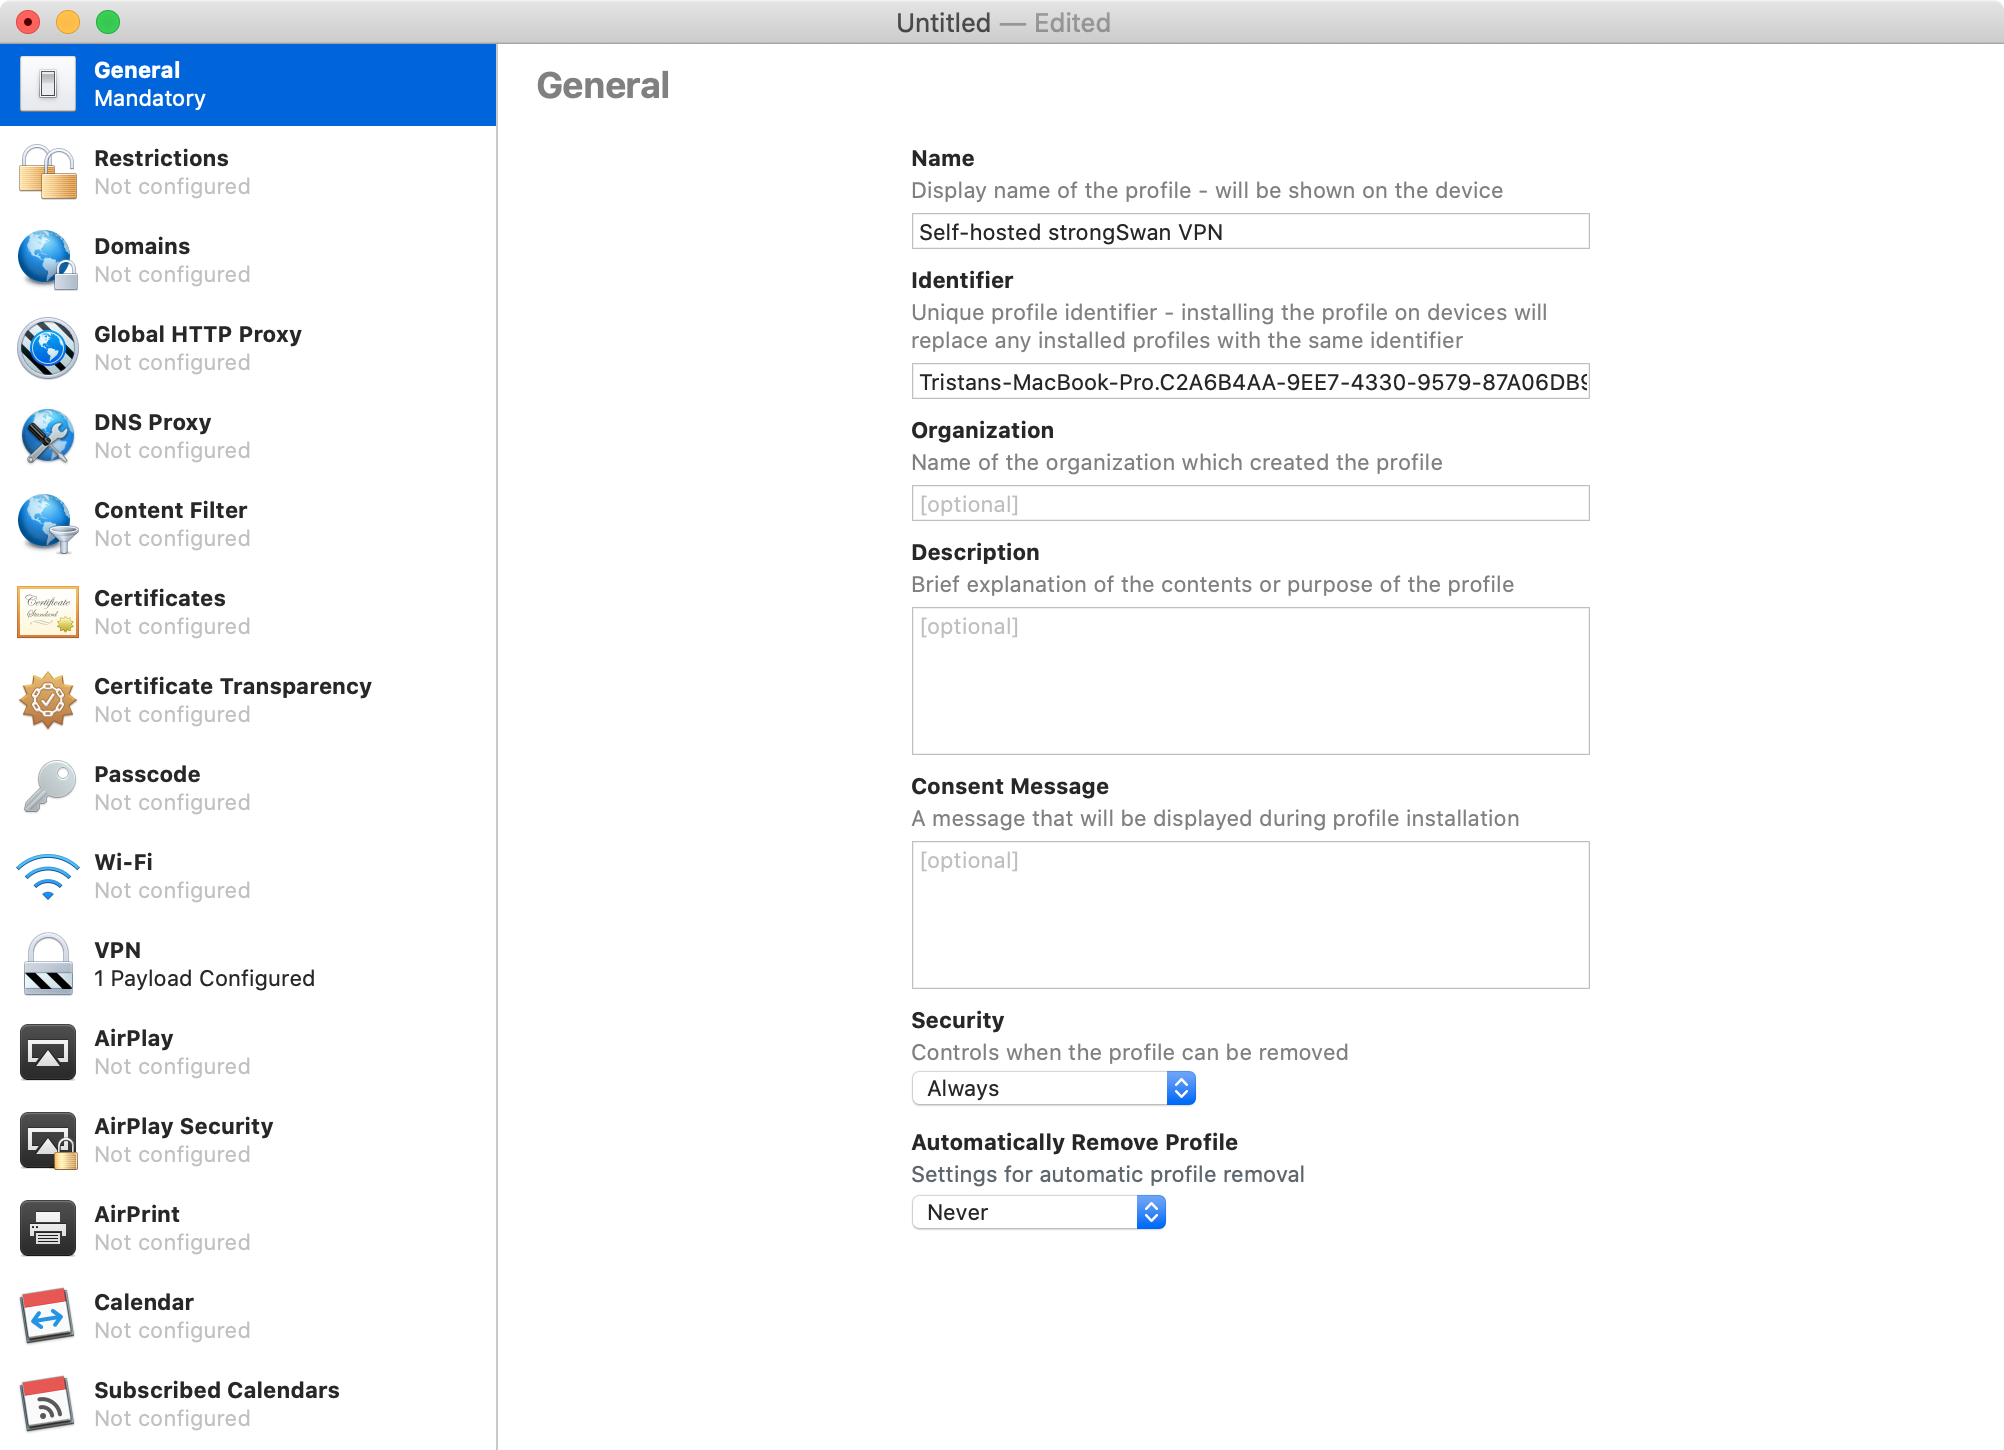
Open "Apple Configurator 2", then click "File", then "New Profile".
In "General", enter "Self-hosted strongSwan VPN" in "Name".
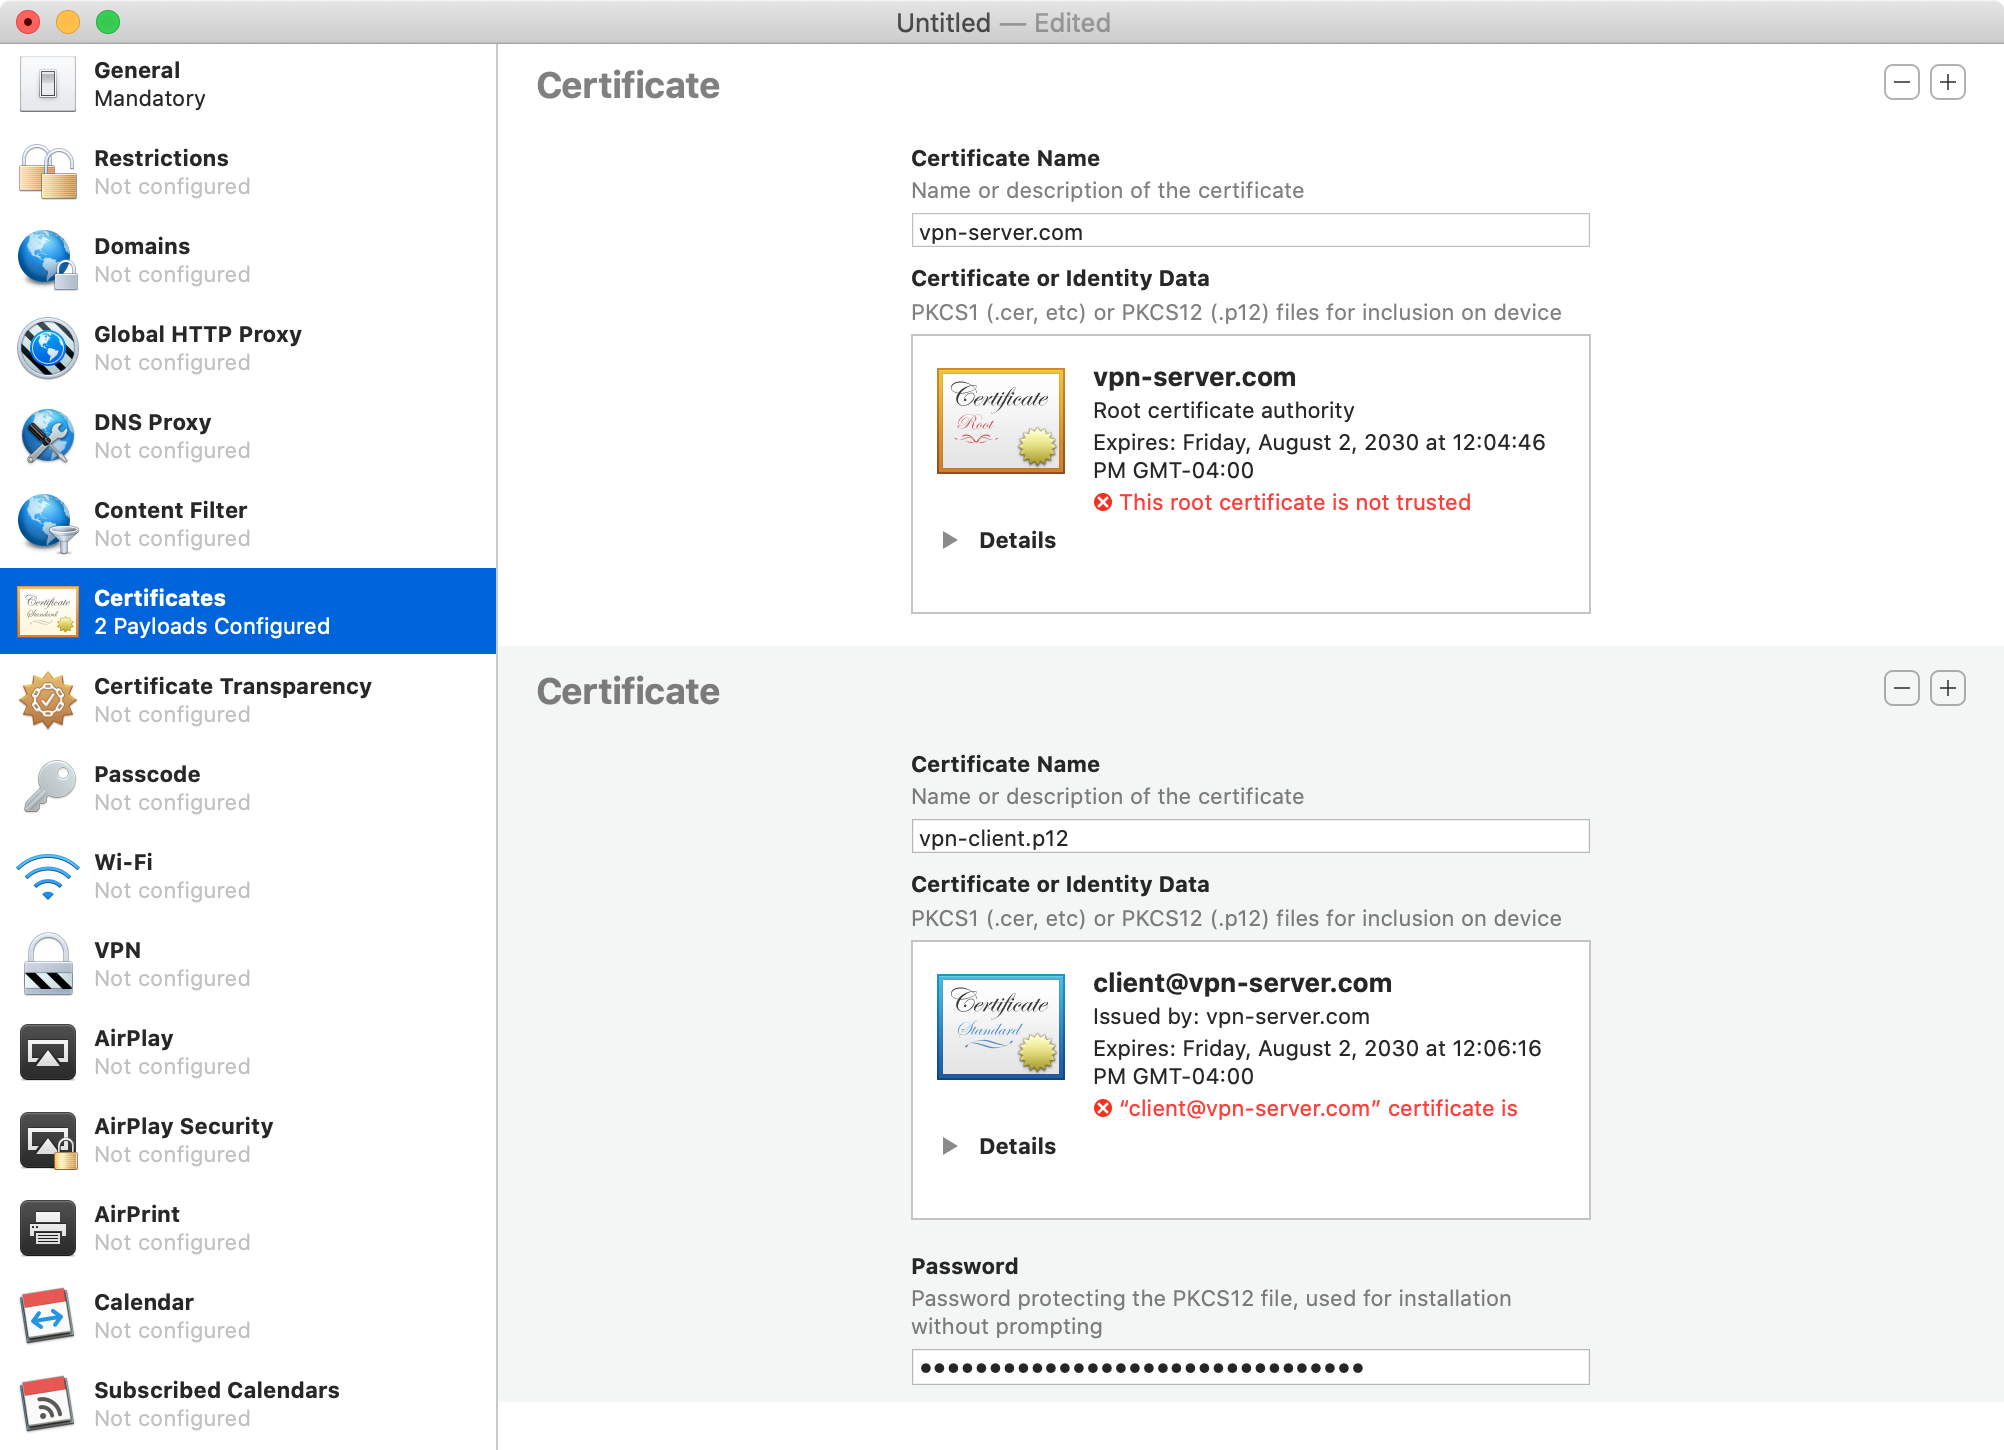
In "Certificates", click "Configure" and select "ca.crt". Then click "+" and select "vpn-client.p12". The password is the one from step 26.
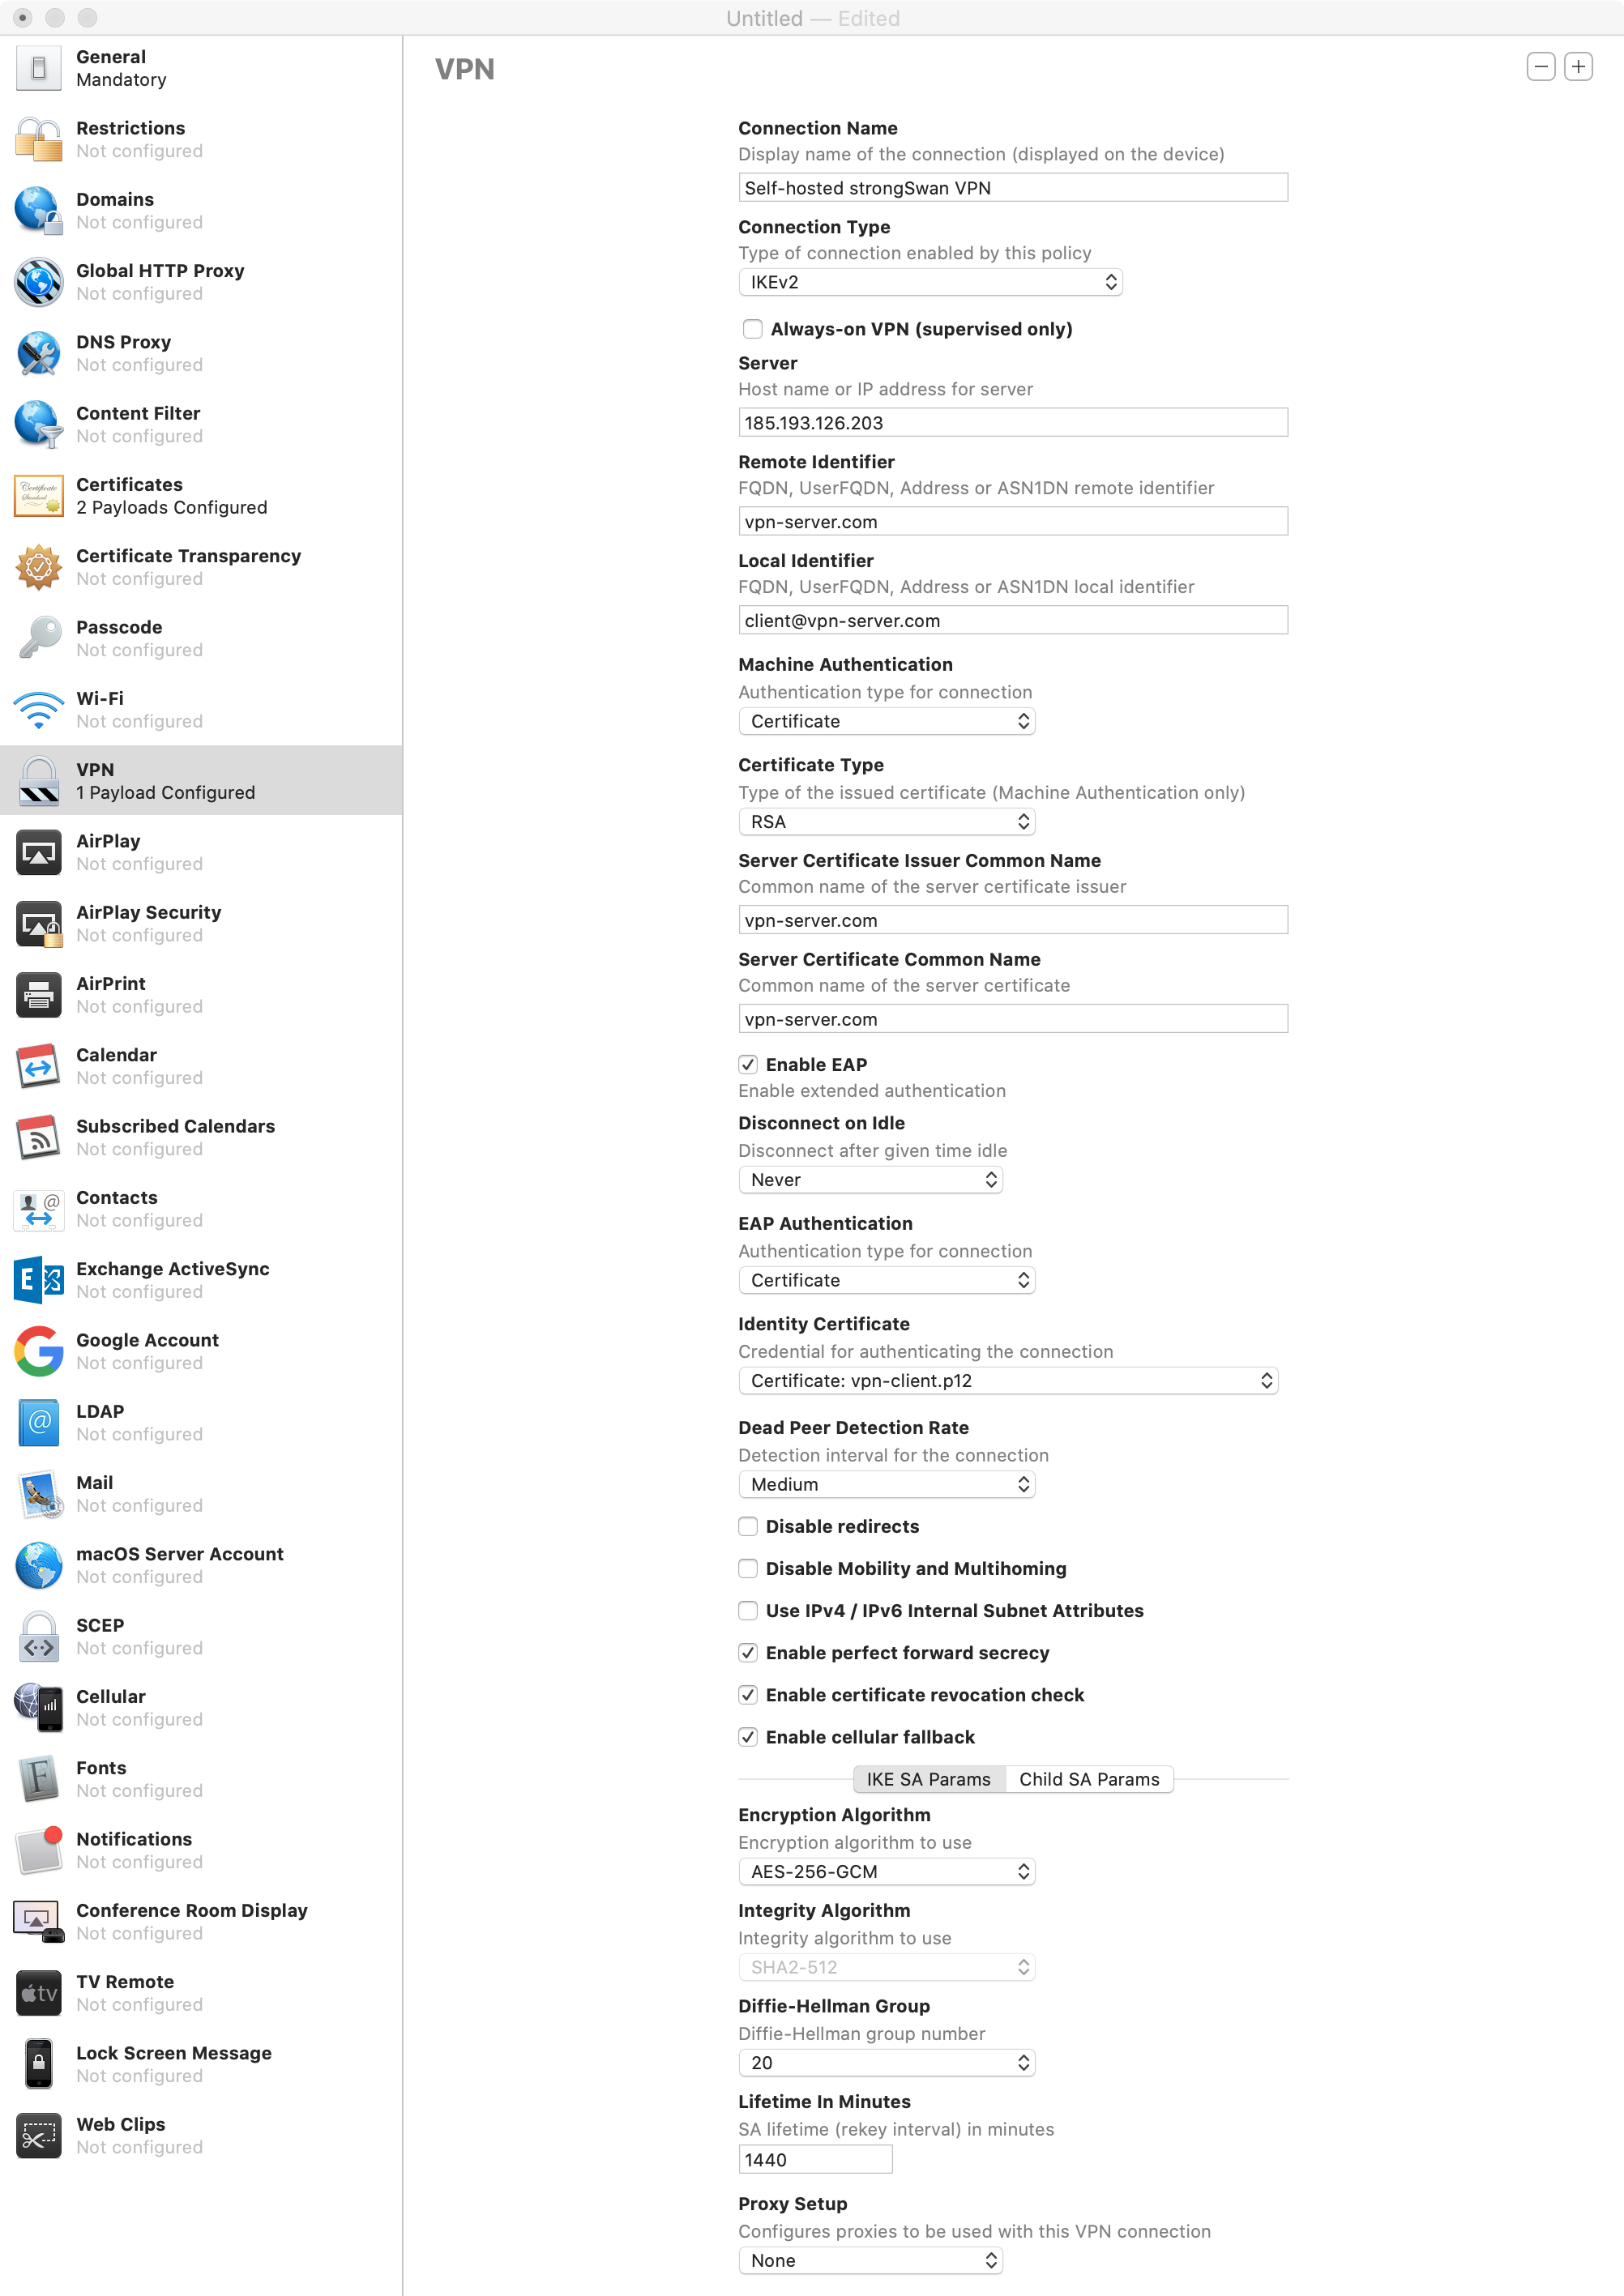
In "VPN", click "Configure" and enter the settings from the following screenshot (replace 185.193.126.203 with IP of server).
The "Child SA Params" are the same as "IKE SA Params".
Finally, click "File", then "Save", and save file as "Self-hosted strongSwan VPN.mobileconfig".
Step 31: add VPN profile to Mac
This step is super simple, simply double-click "Self-hosted strongSwan VPN.mobileconfig" and follow instructions.
Step 32: add VPN profile to iPhone using Apple Configurator 2
Unlock iPhone, connect it to Mac using USB cable and open Apple Configurator 2.
In "All Devices", double-click on iPhone, then "Add", and finally "Profiles".
Select "Self-hosted strongSwan VPN.mobileconfig" and follow instructions.
On iPhone, open "Settings", then "Profile Downloaded" and tap "Install"